In my AccountController's LogIn method, since I've added Role based authentication to the site,
I wanted to use User.IsInRole( "Admin" ) to check for an Admin role.
Of course that doesn't work!
So instead, I had to do this:
decimal id = Identity.LookupId( details.MemberName, db );
Identity Id = Identity.Load( id, db );
if( Id.RoleIndex == 1 )
{
...
}
That's two hits to the database, but I do those two hits on almost every page so I know that the server can easily handle the task at hand.
Why was I interested in this:
Well we have two different controllers and I wanted the Admin role to be sent to the AdminController and normal Users to be sent to the BackOfficeContoller.
Sunday, December 23, 2012
Wednesday, December 19, 2012
Ever want to create a list of logged in users for a site, maybe for the Admin view or all users?
Here's how:
In your AccountController add a simple class:
public class LoggedInUsers
{
public string MemberName { get; set; }
public DateTime LoggedInTime { get; set; }
public LoggedInUsers( string memberName, DateTime loggedInTime )
{
MemberName = memberName;
LoggedInTime = loggedInTime;
}
}
Then in your AccountController add a:
public static List<LoggedInUsers> OnlineUsers;
Then in your AccountController's [HtmlPost] Login(...) method add this line for authenticated users:
AccountController.OnlineUsers.Add( new LoggedInUsers( details.MemberName, DateTime.Now ) );
This adds a new user to the OnlineUsers list.
To remove a entry from the list:
In your Logout() method (you have one of these, right?):
Add this:
if ( AccountController.OnlineUsers.Count > 0 )
{
If( AccountController.OnlineUsers.Count > 0 )
{
LoggedInUsers member = AccountController.OnlineUsers.First( m => m.MemberName == User.Identity.Name );
AccountController.OnlineUsers.Remove( member );
}
}
Just before this:
FormsAuthentication.SignOut();
There is one other place you'll need to add some code and that is in your global.asax Session_End method like this:
protected static void Session_End( object Sender, EventArgs e )
{
if( AccountController.OnlineUsers.Count > 0 )
{
LoggedInUsers member AccountController.OnlineUsers.Find( m => m.MemberName == HttpContext.Current.User.Identity.Name );
if( member != null )
AccountController.OnlineUsers.Remove( member );
}
}
We need to check here if the member is null because if a user logged out he/she will already be removed from the OnlineUsers list.
Next you need to create a partial view method in your controller:
public PartialViewResult OnlineUsers()
{
List<LoggedInUsers> data = AccountController.OnlineUsers;
return PartialView( data );
}
Now you can create a partial view for logged in users to see:
@model List<My_MSI.Net.Controllers.LoggedInUsers>
@foreach ( My_MSI.Net.Controllers.LoggedInUsers user in Model )
{
@Html.Label( @Html.Lable( String.Format( "{0} logged in at {1}", user.MemberName, user.LoggedInTime.Tostring() ) )<br />
}
Finally in your _Layout.cshtml file (You do have one of these, right?):
<div class="move-right">
@{ Html.RenderAction( "OnlienUsers", "Your controllers name" ); }
</div>
Now you logged in users can see who else is logged in.
If you want to show logged in users you'll have to create this View in your Home controller:
public ActionResult OnlineUsers()
{
List<LoggedInUsers> data = AccountController.OnlineUsers;
return View( data );
}
And a View:
@model List<My_MSI.Net.Controllers.LoggedInUser{@ViewBagTitle = "OnlineUsers";Layout = "~/Views/Shared/_Layout.cshtml";}<h2>OnlineUsers</h2>
@foreach ( My_MSI.Net.Controllers.LoggedInUsers user in Model )
{
@Html.Label( String.Format "{0} logged in at {1}", user.MemberName, user.LoggedInTime.ToString() )<br />
}
Finally add a new menu item for Online Users and link it back to your OnlineUsers() method.
That's it. You've successfully created a list of Online Users that Logged in members can see and a link were the general public can see who's logged in.
Sunday, December 16, 2012
How solve Unexpected Logout issues
When you set the Session TimeOut to 20, you would expect the Session to expire after 20 minutes of inactivity. However, you're using Session State Mode InProc (the default value), which means that the SessionState is stored in memory. When the Application Pool recycles. all Sessions stored in Memory will be lost. There can be many reasons why the Application Pool recycles.
http://blogs.msdn.com/b/johan/archive/2007/05/16/common-reasons-why-your-application-pool-may-unexpectedly-recycle.aspx
Also, in a shared hosted environment, Application Pools recycles frequently. To overcome both problems, you should consider to use another SessionState Mode:
http://msdn.microsoft.com/en-us/library/ms178586(v=vs.100).aspx
But this has nothing to do with authentication, as already stated! When you set the forms authentication to 20 minutes, it means that the user will be logged out anywhere between 10 to 20 minutes of inactivity. This is because the authentication ticket is only reset after more than half of the timeout has expired.
http://msdn.microsoft.com/en-us/library/system.web.configuration.formsauthenticationconfiguration.slidingexpiration.aspx
But sometimes the authentication ticket seems to expire unexpectedly also, forcing the user to the login page.. To understand why this happens, you need to understand how authentication works.
When you login, an authentication ticket is created in a cookie. By default, this authentication ticket encrypted using the machinekey section in web.config. When this section is not specified in web.config, ASP.NET will generate one for you. If the application pool recycles, sometimes ASP.NET will generate a new machinekey (although MSDN says different!) especially in shared hosted environment. But with this new key, the authentication ticket cannot be decrypted anymore, so the user is redirected to the login page. To overcome this, simply add a machinekey section in your web.config, so the same key is used on each and every request:
http://www.developmentnow.com/articles/machinekey_generator.aspx
Thursday, December 13, 2012
Ever had a View in MVC that was being reused by the Controller but the View doesn't display all the fields from the Model class?
What doesn't work is creating another view to display the data. So don't waste your time trying to create another View!
What does work is this:
ModelState.Remove( "yourModel'sDataName" );
You put the above statement (with your Model's Data Name) in the controller for every field that is not displaying even though you know that the Model class has data.
.
Monday, December 3, 2012
Ever wonder how to update a record with Entity Framework?
Well, I'm about to show you how to do that with the controller:
[HttpPost]
public ActionResult Manage( Home data, decimal Id1, decimal Id2 ){
data.MemberId.Id = Id1;
data.MemberDetails.Id = Id2;
Identity record = db.Identity.FirstOrDefault( m => m.Id == Id1 );
record.Copy( data.MemberId );
Details det = db.Details.FirstOrDefault( m => m.Id == Id2 );
det.Copy( data.MemberDetails );
( (EFDbContext) db ).SaveChanges();
data.Status = "Changes were sucessfully saved";
return View( data );}
What we are accomplishing here is this:
The user has modified his/her Identity and/or Details records and we need to store them in the database.
These records come back to us in a Home record that is simply a holder of several types needed by the home page of the site.
The first thing we do is assign the record numbers to the two records because they are 0 when we get them in the controller.
The next thing we do is read those records from the database again (that connection to the database was lost someplace between the [HttpGet] method that passes a Home record to the View).
Then we call a copy method on the record to copy the updated info into the current record.
We do those last two steps twice once for each record type.
The next thing we do is call .SaveChanges() to write the updated info to the database.
The next thing we do is provide a little feedback to the user in a [NotMapped] field on the Home class.
Finally we return to the View passing the data we recieved.
This is much easier than calling .SqlQuery( "Update..." ); especailly when the detail record has way too many members!
Sunday, November 4, 2012
Ever seen a site that has a none movable side menu?
It's easy to use with CSS:
For IE 9 what works best is replacing: float: left; with: left: 0px; or if you want you menu on the right: right: 0px; works best in IE 9 because sometimes JavaScript or AJAX changes things that cause a Partial View to be missplaced.
DIV.floating-menu a, DIV floating-menu h3 { background: white; color: Black; font: Arial Bold; margin: 0 0.5em; text-align: center; }
Then in your HTML you just need to do something like this:
<div class="floating-menu">
<!--- your menu goes here -->
</div>
The key settings in the DIV.floating-menu CSS script are:
float: left;
position: fixed;
z-index: 100;
Again if using IE 9, replace: float: left; with left: 0px; or right: 0px because those work better with JavaScript and/or AJAX.
Any of the other setting is the DIV.floating-menu CSS script may be changed to anything you desire.
It's easy to use with CSS:
DIV.floating-menu
{
    background: white;
    float: left;
    color: black;
    padding: 10px 10px 10px 10px;
    position: fixed;
    text-align: center;
    width: 200px;
    z-index: 100;
}
For IE 9 what works best is replacing: float: left; with: left: 0px; or if you want you menu on the right: right: 0px; works best in IE 9 because sometimes JavaScript or AJAX changes things that cause a Partial View to be missplaced.
DIV.floating-menu a, DIV floating-menu h3 { background: white; color: Black; font: Arial Bold; margin: 0 0.5em; text-align: center; }
Friday, March 9, 2012
What is My-MSI.Net?
My-MSI.Net is a start-up company located in Falls Church, VA.
What does My-MSI.Met do?
My-MSI.Net writes Desktop applications for it's members to download from their Back Office web site.
What do you need to run these Desktop Aplications?
Nothing more than a Windows (XP or later) and an Internet connection.
What technology do these Destop Applications use?
We use Microsoft's .Net Framework and C#.
What version of Microsoft's .Net is used?
Currently we are using .Net version 4.0.
What is the cost to join My-MSI.Net?
Just $25.
What is the subscription cost for My-MSI.Net?
Just less than $0.90 per day, billed as $25 every 4 weeks*.
What's the * mean?
It means that we won't be starting the subscription fees until everyone on the 3rd level of the Matrix has 4 Members under them.
Are there any positions on the 3rd level of the Matrix still available?
Yes, we currently have 7 open positions on the 3rd level of the Matrix.
Are there any other expenses involved with being a member of My-MSI.Net?
Not for people on the 3rd level of the Matrix. For people on the 4th level (or higher) will need to promote their referral site. The expected cost of promoting a members referral site is $50 to $150 per month. All of the details will be available in the Back Office site.
What form is the Matrix behind My-MSI.Net?
My-MSI.Net uses a 4x5 Matrix, meaning that everyone has 4 people under them and they get paid 5 levels deep.
What do members get paid?
$6.25 from everyone on your first level (4 x $6.25 = $25) Reach this goal and your subscription fee no longer comes from your pocket!
$1.25 from everyone on your second level (&1.25 x 16 = $20 in pure profit every 4 weeks.
$1.50 from everyone on your third level ($1.50 x 64 = $96 + $20 = $116 every 4 weeks.
$2.25 from everyone on your fourth level ($2.25 x 256 = $576 + $116 = $692 every 4 weeks.
$3.00 from everyone on your fifth level ($3.00 x 1,024 = $3,072 + $692 = $3,764 every 4 weeks.
Where does the rest of my $25 subscription fee go?
$0.80 goes into the Bonus Pool, and $9.95 goes to pay for your referral site and your Back Office site. That $9.95 is closer to $9.00 by the time the Admin gets it because the Admin pays the transaction fees for all incoming funds.
Does that mean that members pay a transaction fee to get their money out?
Yes it does, but they will only be paying $5 on a $3,764 transaction.
Who is developing the Desktop Applications? We have one Sr. .Net developer right now but plan to hire more as our member base grows.
That's all you need to know about My.MSI.Net.
Thursday, February 23, 2012
What is Object Oriented programming?
Object Oriented programming started back when C++ came out.
The three tenents of Object Oriented programming are:
Inheritance
Encapsualtion
Polymorphism
Let's tackle these one at a time....
Inheritance
Let's say you have a class called Vehicle and defined as:
public class Vehicle
{
protected int wheels;
protected int seats;
protected int speed;
protected float fuel;
public Vehicle( int Wheels, int Seats, int Speed, float Fuel )
{
wheels = Wheels;
seats = Seats;
speed = Speed;
fuel = Fuel;
}
public virtual void Drive();
}
Now let's say that you need a class called Car and another called Motorcycle:
public class Car : Vehicle
{
public Car( int Seats, int Speed, float Fuel )
{
base.wheels = 4;
base.seats = Seats;
base.speed = Speed;
base.fuel = Fuel;
}
public virtual void Drive()
{
// Drive the car
}
}
public class Motorcycle : Vehicle
{
public Motorcycle( int Seats, int Speed, float Fuel )
{
base.wheels = 2;
base.seats = Seats;
base.speed = Speed;
base.fuel = Fuel;
}
public virtual void Drive()
{
// Drive the Motorcycle
}
}
Notice that the Car and the Motorcycle have no local storage, only the Vehicle has data members.
Also notice the : Vehicle after Car and Motorcycle this indicates that Car and Motorcycle inherit from Vehicle.
Encapsualation
Now let's say that you create a Radio class for entertainment.
public class Radio
{
private float station;
private float volume;
private bool on;
public void Tune( float Station )
{
station = Station;
}
public void VolumeUp( float amount )
{
volume += amount;
}
public void VolumeDown( float amount )
{
volume -= amount;
}
public void ToggleOnOff()
{
on = !on;
}
}
Now you'd like to add the radio to the Car but you don't think it belongs in Vehicle.
public class Car
{
private Radio radio = new Radio();
public void Tune( float Station )
{
radio.Tune( Station );
}
public void VolumeUp( float amount )
{
radio.VolumeUp( amount );
}
public void RadioOnOff()
{
radio.ToggleOnOff();
}
// the rest of Car is as before
}
You could say that the Radio is encapsualated within the Car.
Polymorphism
Let's say that you've created a Shape class as:
public class Shape
{
public virtual float Area();
public virtual void Draw();
}
Now you want to create some specific shapes:
public class Circle : Shape
{
private int diameter;
public Circle( int Diameter )
{
diameter = Diameter;
}
public virtual float Area()
{
// compute the Area of a circle
return 0.0; // temp value until we actually compute the area
}
public virtual void Draw()
{
// draw the Circle
}
}
public class Square : Shape
{
int side;
public Square( int Side )
{
side = Side;
}
public virtual float Area()
{
return side * side;
}
public virtual void Draw()
{
// draw the Square
}
}
Next you want to randomly create either a Circle or a Square:
public class Factory
{
public Shape Create()
{
Shape shape = new Shape();
Random r = new Random( DateTime.Now.Second );
switch( r.Next( 0, 1 )
{
case 0:
shape = new Circle( r.Next( 10 ) );
break;
case 1:
shape = new Square( r.Next( 10 ) );
break;
}
return shape;
}
}
Next let's say that you want to create a loop that draw circles and squares without knowing which one you have:
public DrawShapes()
{
Factory f = new Factory();
for( int i = 0; i < 10; ++i )
{
Shape s = f.Create();
s.Draw();
}
}
What you just saw was an example of Polymorphism.
Now that you understand the basics of Object Oriented programming, how do you go about designing your own classes?
Classes are generally nouns or things. Notice our example classes were Vehicle, Car, Motorcyle, Shape, Circle and Square.
Data within classes are generally either private or protected.
Methods within Classes are generally verbs or actions. Notice that our methods were Drive, Area, Draw, etc.
Methods are generally public but if you need a private helper method that's fine too.
And that's about all you need to know about Object Oriented programming.
Tuesday, February 21, 2012
What is this thing called C#?
C# is a computer programming language based on C and C++. If you've ever learned either of those languages C# will fit like a glove.
C# has all the operators of C and C++.
C# does away with the header files used in C++.
Like C and C++ every line of code in C# is terminated with a semicolon.
A simple variable declaration looks like:
string aString = "some string";
A simple test looks like:
if( aString == "some string" )
{
// do something usefull
}
A for loop looks like:
for (int i = 0; i <= 10; ++i )
{
// do something usefull
}
If you have a collection of objects, like:
List<string> aList = new List<string>();
You can use a for each loop:
for each( string str in aList )
{
// do something with str
}
If you have a loop of indeterminate length, you can do something like:
bool flag = false;
while( flag == false )
{
// do something usefull
// when done simply:
flag = true;
}
If you have a loop that needs to always go through a least 1 iteration, you can do something like:
bool flag = false;
do while ( flag == false )
{
// do somethig usefull
// when done simply
flag = true;
}
To define a namespace, you simply do this:
namespace my.nameSpace
{
// whatever you want in that namespace
}
To define a class, you simply do this:
public class myClass
{
// these are the class members
private int anInt;
private string aString;
public myClass ( int i, string s ) // this is the class constructor, it initilizes the class members
{
anInt = i;
aString = s;
}
public anAction()
{
// perform an action on the class members
}
public anotherAction()
{
// perform another action on the class members
}
}
To use your newly defined class, you simply
using my.nameSpace;
myClass _myClass = new myClass( 1, "some string" );
_myClass.anAction();
_myClass.anotherAction();
Of course the language of C# is not hard to learn and remember, the .Net framework is the challenging part of this equation. Your best on-line resource for the .Net framework is: http://msdn.microsoft.com/en-us/library
Saturday, February 11, 2012
How to create a MVC 3 web site
To create a MVC application, you need to understand three things:
1) The M in MVC stands for Model which is nothing more than a class within the Models namespace.
2) The V in MVC stands for View which is the web page but it uses a different syntax call Razor
which just means that you'll use a @ symbol at the front of the interesting parts.
3) The C in MVC stands for Controller which is in the Controllers namespace and this replaces the code behind file in ASP.Net.
Step 1: Open Visual Studio 2010 (which is the only version that supports MVC 3).
You'll need to install some Essential Software:
WebPI available at http://microsoft.com/web/downloads and click the download link. Download and run the installer. The name is a little confusing: this is the installer for the WebPI. The download is a regular Windows installer, which installs the WebPI tool. You'll use this tool to download and istall web application components.
The WebPI will start automatically, and you will see the selection window.
There are thrre categories aross the top of the screen. The components we are interested in are:
Visual Studio 2010 SP1,
ASP.NET MVC 3 Tools Update,
SQL Server Express 2008 R2 (this one is optional since our application doesn't need a database).
You will need at a minimum Windows XP Professional because IIS ships with only that version of Windows-XP. IIS ships with Windows-Vista and Windows-7 as well.
Step 2: Create a new ASP.NET MVC 3 Web Appliction and call it HelloWorld_MVC
Step 3: Select a Empty project template and select the Razor View Engine.
Step 4: Create some special folders under your project: Content, Controllers, and Models
Step 5: Right click on the Models folder and add a new Class called HelloWorldData.
This is what your HelloWorldData class should look like:
using System;
namespace HelloWorld_MVC.Models
{
public class HelloWorldData
{
public Name { get; set; }
public Greeting { get; set; }
}
}
Step 6: Compile your project. This is very important because without compiling your project we won't be able to complete a future step.
Step 7: Right click on the Controllers folder and add a new Controller class called
HelloWorldController.
This is what your HelloWorldController class should look like:
using System;
using System.Web;
using System.Web.Mvc;
using HellowWorld_MVC.Models;
namespace HelloWorld_MVC.Controllers
{
public class HelloWorldController
{
public HelloWorldController()
{
}
public ActionResult HelloWorld_MVC()
{
HelloWorldData data = new HelloWorldData();
return View( data );
}
}
}
Step 8: Right-Click on View and select Add View from the pop-up menu.
Step 9: The name is your method name by default, so we'll acept that.
Step 10: Check the box for Create a strongly typed view and select the HelloWorldData from the
dropdown list.
Step 11: Uncheck the Use a layout or master page checkbox.
Your web page should look something like:
@model HelloWorld_MVC.Models.HelloWorldData
@{
ViewBag.Title = "Hello World MVC";
}
<h2>Hello World MVC</h2>
<div class="body">
@using( Html.BeginForm())
{
@Html.EditorForModel()
@Html.ActionLink( "Get Greeting", "HelloWorld_MVC", "HelloWorld" )
}
</div>
Step 11: This step is optional, but for instruction reasons, strongly recommended. Try running your site now and try clicking on the Get Greeting link. What happens? Don't worry right now, we're not done with our controller.
Step 12: Modify your controller as follows:
using System;
using System.Text;
using System.Web;
using System.Web.Mvc;
using HellowWorld_MVC.Models;
namespace HelloWorld_MVC.Controllers
{
public class HelloWorldController
{
public HelloWorldController()
{
}
[HttpGet]
public ActionResult HelloWorld_MVC()
{
HelloWorldData data = new HelloWorldData();
return View( data );
}
[HttpPost]
public ActionResult HelloWorld_MVC( HelloWorldData data )
{
StringBuilder sb = new StringBuilder();
sb.Append( "Hello " );
if( data.Name.Length != 0 )
sb.Append( data.Name );
else
sb.Append( "World" );
data.Greeting = sb.ToString();
return View( data );
}
}
}
Things to take note of:
1) We added an using statement: using System.Text;
2) We added a descriptor to our existing HelloWorld_MVC() function: [HttpGet]
3) We added a new HelloWorld_MVC function that takes a HelloWorldData parameter and gave it the [HttpPost] descriptor.
Step 13: Right-click on the View in the new method in your controller and select Go To View from the pop-up menu. if your previous View comes up, then that's great. If not, modify that View parameter list to include as the first parameter: "HelloWorld_MVC" as in View( "HelloWorld_MVC", data );
Run your project again, and now the Get Greeting link will work as expected.
Congradulations, you've sucessfully created your first ASP.Net MVC 3 site!
Friday, February 10, 2012
How to create an ASP.Net web site
Step 1: Open Visual Studio
Step 2: Create a new empty web forms project, name it: HelloWorld_Web
Step 3: Add a new Web Form to the HelloWorld_Web project, named Default.aspx
At this point, you should have a file that looks like:
Step 5: Switch over to Design mode (look at the bottom of your web page file)
Step 6: Add a Label to the page, set it's text property to "What's Your Name"
Step 7: Add a TextBox to the page, set it's Name property to txtName
Step 8: Add a LinkButton to the page, set it's Name property to lnkGetGreeting
Step 9: While on the property page for the LinkButton, go to the Events tab and double-click in the Click field. This will open up the code behind file and place an event handler in there. This is what the event handler code should look like:
void lnkGetGreeting_Click( object sender, EventArgs args )
{
StringBuilder sb = new StringBuilder();
sb.Append( "Hello " );
if( txtName.Text.Length != 0 )
sb.Append( txtName.Text )
else
sb.Append( "World" )
lblGreeting.Text = sb.ToString();
}
Step 10: Go back to Default.aspx. Add a Label to the page, set it's Name proerty to lblGreeting.
Run your page, click the GetGreeting link without entering a name, you should see "Hello World" appear in the lblGreeting Label. Next, enter your name in the first text field and click on the GetGreeting link again, you should see "Hello <your name>" this time.
Step 2: Create a new empty web forms project, name it: HelloWorld_Web
Step 3: Add a new Web Form to the HelloWorld_Web project, named Default.aspx
At this point, you should have a file that looks like:
<form id="form1" runat="server">
<div>
</div>
</form>
Step 5: Switch over to Design mode (look at the bottom of your web page file)
Step 6: Add a Label to the page, set it's text property to "What's Your Name"
Step 7: Add a TextBox to the page, set it's Name property to txtName
Step 8: Add a LinkButton to the page, set it's Name property to lnkGetGreeting
Step 9: While on the property page for the LinkButton, go to the Events tab and double-click in the Click field. This will open up the code behind file and place an event handler in there. This is what the event handler code should look like:
void lnkGetGreeting_Click( object sender, EventArgs args )
{
StringBuilder sb = new StringBuilder();
sb.Append( "Hello " );
if( txtName.Text.Length != 0 )
sb.Append( txtName.Text )
else
sb.Append( "World" )
lblGreeting.Text = sb.ToString();
}
Step 10: Go back to Default.aspx. Add a Label to the page, set it's Name proerty to lblGreeting.
Run your page, click the GetGreeting link without entering a name, you should see "Hello World" appear in the lblGreeting Label. Next, enter your name in the first text field and click on the GetGreeting link again, you should see "Hello <your name>" this time.
Thursday, February 9, 2012
How to create a simple WinForms Project?
Step 1: Start up Visual Studio.
Step 2: Create a new Windows Forms project called HelloWorld.
Step 3: Drag a Label control onto the Form and set it's Text property to "What's Your Name:'.
Step 4: Drag a TextBox control onto the Form and name it txtName.
Step 5: Drag a Label control onto the form, clear it's Text property and name lblGreeting.
Step 6: Drag a Button control onto the form and name it btnExit.
Step 7: Drag a Button control onto the form and name it btnGreeting.
Step 8: Right click away from the Form and select View Code from the pop-up menu.
When you first created the Windows Forms project, Visual Studio started you off with a blank form called Form1 and created this program.cs file:
With just that much code, if you run the form, it will resize, minimize, and close with the close button, but the btnExit and btnGreeting buttons will accomplish nothing yet.
To make the btnExit accomplish what it should be doing, add this to your Form1 class
To make the btnGreeting accomplish what it should be doing, add this to your Form1 class:
Now you can run the form again.
Try hitting the Get Greeting button without entering anything in the Text Box.
You should see that the lblGreeting was set to "Hello World".
Try putting your name into the Text Box and then hit the Get Greeting button again.
This time you should see "Hello <your name>"
Now, let's talk about what the btnGreeting_Click method was actually doing:
Since we are building a two part string, we used a StringBuilder class and named it sb. If we had left it at that we would have had a null object since all classes are objects. So that's why sb = new StringBuilder();
The next thing we do is sb.Append( "Hello " ); This appends the word "Hello" followed by a space to our empty sb.
What comes next is a test on the length of the string entered into the Text Box.
if( txtName.Text.Lenght != 0 )
If this condition is true, we append the txtName.Text onto our sb, with
sb.Append( txtName.Text);
If this condition is false, we append "World" onto our sb, with sb.Append( "World" );
Finally, we set the lblGreeting's Text property to the contents of our sb, with
lblGreeting.Text = sb.ToString();
Now we'll talk a little about the btnExit_Click method:
This event handler only has one thing to do, cause the application to exit. To accomplish this task, we use the Application class that is part of the Form class that our Form1 class inhereted from. Application.Exit();
There is only one more addition to make to make our form's title bar say "Hello World" instead of "Form1":
In the Form1 constructor, public Form1() after the call to InitializeComponent() add this line:
Text = "Hello World";
Congradulations, you've now created your first Windows Forms project!
But what was that program.cs file doing? In every Windows Forms project there has to be a starting place, and that starting place is a static method called Main in a class called Program. Now the class called Program is enclosed within a namespace called HelloWorld.
Up above the namespace and class we have two necessary using statements;
using System;
using System.Windows.Forms;
These pull in the namespaces needed by our HelloWorld project.
The next two lines just set up some default actions on the Appliction class. It's the third line that very important for our purposes:
Application.Run( new Form1() );
When we say new Form1() we are getting a new instance of the class Form1. So this third line is telling the Appliction to Run a new Form1(); Which calls the constructor Form1() which calls InitializeCompentent(); which puts all of our controls on the form.
And now you understand how a Windows Forms project gets started.
Step 2: Create a new Windows Forms project called HelloWorld.
Step 3: Drag a Label control onto the Form and set it's Text property to "What's Your Name:'.
Step 4: Drag a TextBox control onto the Form and name it txtName.
Step 5: Drag a Label control onto the form, clear it's Text property and name lblGreeting.
Step 6: Drag a Button control onto the form and name it btnExit.
Step 7: Drag a Button control onto the form and name it btnGreeting.
Step 8: Right click away from the Form and select View Code from the pop-up menu.
When you first created the Windows Forms project, Visual Studio started you off with a blank form called Form1 and created this program.cs file:
using System;
using System.Windows.Forms;

namespace HelloWorld
{
  static class Program
  {
    /// <summary>
    /// The main entry point for the application.
    /// </summary>
    [STAThread]
    static void Main()
    {
      Application.EnableVisualStyles();
      Application.SetCompatibleTextRenderingDefault( false );
      Application.Run( new Form1() );
    }
  }
}
When you selected View Code from the pop-up menu you got something like this:
using System;
using System.Text;
using System.Windows.Forms;

namespace HelloWorld
{
  public partial class Form1 : Form
  {
    public Form1()
    {
      InitializeComponent();
    }
  }
}
Notice the using System.Text; line at the top of the form1.cs file, that is the namespace that includes the StringBuilder class that we are using.
With just that much code, if you run the form, it will resize, minimize, and close with the close button, but the btnExit and btnGreeting buttons will accomplish nothing yet.
To make the btnExit accomplish what it should be doing, add this to your Form1 class
    private void btnExit_Click( object sender, EventArgs e )
    {
      Application.Exit();
    }
To make the btnGreeting accomplish what it should be doing, add this to your Form1 class:
    private void btnGreeting_Click( object sender, EventArgs e )
    {
      StringBuilder sb = new StringBuilder();

      sb.Append( "Hello " );

      if ( txtName.Text.Length != 0 )
        sb.Append( txtName.Text );
      else
        sb.Append( "World" );

      lblGreeting.Text = sb.ToString();
    }
Now you can run the form again.
Try hitting the Get Greeting button without entering anything in the Text Box.
You should see that the lblGreeting was set to "Hello World".
Try putting your name into the Text Box and then hit the Get Greeting button again.
This time you should see "Hello <your name>"
Now, let's talk about what the btnGreeting_Click method was actually doing:
Since we are building a two part string, we used a StringBuilder class and named it sb. If we had left it at that we would have had a null object since all classes are objects. So that's why sb = new StringBuilder();
The next thing we do is sb.Append( "Hello " ); This appends the word "Hello" followed by a space to our empty sb.
What comes next is a test on the length of the string entered into the Text Box.
if( txtName.Text.Lenght != 0 )
If this condition is true, we append the txtName.Text onto our sb, with
sb.Append( txtName.Text);
If this condition is false, we append "World" onto our sb, with sb.Append( "World" );
Finally, we set the lblGreeting's Text property to the contents of our sb, with
lblGreeting.Text = sb.ToString();
Now we'll talk a little about the btnExit_Click method:
This event handler only has one thing to do, cause the application to exit. To accomplish this task, we use the Application class that is part of the Form class that our Form1 class inhereted from. Application.Exit();
There is only one more addition to make to make our form's title bar say "Hello World" instead of "Form1":
In the Form1 constructor, public Form1() after the call to InitializeComponent() add this line:
Text = "Hello World";
Congradulations, you've now created your first Windows Forms project!
But what was that program.cs file doing? In every Windows Forms project there has to be a starting place, and that starting place is a static method called Main in a class called Program. Now the class called Program is enclosed within a namespace called HelloWorld.
Up above the namespace and class we have two necessary using statements;
using System;
using System.Windows.Forms;
These pull in the namespaces needed by our HelloWorld project.
The next two lines just set up some default actions on the Appliction class. It's the third line that very important for our purposes:
Application.Run( new Form1() );
When we say new Form1() we are getting a new instance of the class Form1. So this third line is telling the Appliction to Run a new Form1(); Which calls the constructor Form1() which calls InitializeCompentent(); which puts all of our controls on the form.
And now you understand how a Windows Forms project gets started.
Monday, February 6, 2012
Implementing HTTP File Upload with ASP.NET MVC
Implementing HTTP File Upload with ASP.NET MVC including Tests and Mocks
A number of folks have asked me how to "implement the ASP.NET File Upload Control" except using ASP.NET MVC. This is a really interesting question for a number of reasons and a great opportunity to explore some fundamentals.
First, ASP.NET MVC is different since we don't get to use ASP.NET Server Controls as we're used to them. There's no "server controls" in the way that we're used to them.
Second, it'd be important to write Unit Tests for something like File Upload, and since ASP.NET MVC tries to be Unit Test friendly, it's an interesting problem to do tests. Why is it interesting? Well, ASP.NET MVC sits on top of ASP.NET. That means ASP.NET MVC didn't do any special work for File Upload support. It uses whatever stuff is built into ASP.NET itself. This may or not be helpful or interesting or even easy to test.
It seems then, that this is a good exercise in understanding a number of things:
Why do we have to add enctype="multipart/form=data" on our forms that include file uploads? Because the form will now be POSTed in multiple parts.
If you have a form like this:
The resulting Form POST will look like this (slightly simplified):
And of course, look at how different this would look if it were just a basic form POST without the enctype="multipart/form=data" included:
See how the content type is different? This is a regular, typical form POST. Perhaps atypical in that it includes only a Submit button!
The point is, when folks add a ASP.NET FileUpload Control to their designer, it's useful to remember that you're buying into an abstraction over something. In this case, you're using a control that promises to hide the whole multipart MIME way of looking at things, and that's totally cool.
Since we can't use ASP.NET Server Controls in ASP.NET MVC, we'll use these classes instead. Here's how you usually grab all the files from an upload and save them:
Of course, you might want to change the directory and filename, maybe check the mimeType to allow only certain kinds of files, or check the length to limit your uploads, but this is the general idea.
Note that Request.Files has been around since 1.x and isn't a strongly typed collection of anything, so the GetEnumerator() of .Files that we're using in the foreach returns strings that are then used as keys into the Files[] indexer. It's a little wonky as it's old.
However, don't let me get ahead of myself, let's write the tests first!
This is incomplete, though, as I'm writing the tests before I the implementation exists. I need to think about how this should be implemented, and as I learn what should be mocked, I need to go back and forth between the tests and the implementation.
If we tried to compile this test, it won't, until I add a few types and methods. Once it actually compiles, but before I write the method itself, I'll want to see it FAIL. If you get a test to PASS on the first try, you don't really know yet if it CAN fail. Making it fail first proves that it's broken. Then you get to fix it.
There's a bit of a chicken and the egg because it's unclear what will need to be mocked out until I start the implementation. However, this draft method above generally says what I want to do. I want to my controller to have a method called UploadFiles() that will grab the uploaded files from Request.Files, save them, then put a type in the ViewData saying which files were saved and how large they were.
Ok, take a breath. The following code may look freaky, but it's really cool actually. You can use any Mock Framework you like, but I like Moq for it's fluency.
We're having to "mock" things because we need to lie to our controller, who's expecting an HTTP Post, remember? It's going to go and spin through Request.Files and try to save each file. Since we want to test this without the web server or web browser, we'll want to tell the Moq framework about our expectations.
At the bottom where I ask for the "UploadedFiles" view, and I pass in my list of ViewDataUploadFilesResults. This will appea in the ViewData.Model property. The View then displays them, and that's ALL the View does.
This post was a long answer to the question "How do I do FileUpload with ASP.NET MVC?" but I feel better having written in this way.
First, ASP.NET MVC is different since we don't get to use ASP.NET Server Controls as we're used to them. There's no "server controls" in the way that we're used to them.
Second, it'd be important to write Unit Tests for something like File Upload, and since ASP.NET MVC tries to be Unit Test friendly, it's an interesting problem to do tests. Why is it interesting? Well, ASP.NET MVC sits on top of ASP.NET. That means ASP.NET MVC didn't do any special work for File Upload support. It uses whatever stuff is built into ASP.NET itself. This may or not be helpful or interesting or even easy to test.
It seems then, that this is a good exercise in understanding a number of things:
- HTTP and How File Upload works via HTTP
- What ASP.NET offers for to catch File Uploads
- How to Mock things that aren't really Mock Friendly
- And ultimately, How to do File Upload with ASP.NET MVC
HTTP and How File Upload works via HTTP
It's always better, for me, to understand WHY and HOW something is happening. If you say "just because" or "whatever, you just add that, and it works" then I think that's sad. For some reason while many folks understand FORM POSTs and generally how form data is passed up to the server, when a file is transferred many just conclude it's magic.Why do we have to add enctype="multipart/form=data" on our forms that include file uploads? Because the form will now be POSTed in multiple parts.
If you have a form like this:
1
2
3
4
5
6
7
| <form action="/home/uploadfiles" method="post" enctype="multipart/form-data"> <label for="file">Filename:</label> <input type="file" name="file" id="file" /> <input type="submit" name="submit" value="Submit" /></form> |
POST /home/uploadfiles HTTP/1.1
Content-Type: multipart/form-data; boundary=---------------------------7d81b516112482
Accept-Encoding: gzip, deflate
User-Agent: Mozilla/4.0 (compatible; MSIE 7.0; Windows NT 6.0; WOW64)
Content-Length: 324

-----------------------------7d81b516112482
Content-Disposition: form-data; name="file"; filename="\\SERVER\Users\Scott\Documents\test.txt"
Content-Type: text/plain

foo
-----------------------------7d81b516112482
Content-Disposition: form-data; name="submit"

Submit
-----------------------------7d81b516112482--
Notice a few things about this POST. First, notice the content-type and boundary="" and how the boundary is used later, as exactly that, a boundary between the multiple parts. See how the first part shows that I uploaded a single file, of type text/plain. You can interpolate from this how you'd expect multiple files to show up if they were all POSTed at once.
And of course, look at how different this would look if it were just a basic form POST without the enctype="multipart/form=data" included:
POST /home/uploadfiles HTTP/1.1
Content-Type: application/x-www-form-urlencoded
UA-CPU: x86
Accept-Encoding: gzip, deflate
User-Agent: Mozilla/4.0 (compatible; MSIE 7.0; Windows NT 6.0; WOW64)
Content-Length: 13

submit=Submit
See how the content type is different? This is a regular, typical form POST. Perhaps atypical in that it includes only a Submit button!
The point is, when folks add a ASP.NET FileUpload Control to their designer, it's useful to remember that you're buying into an abstraction over something. In this case, you're using a control that promises to hide the whole multipart MIME way of looking at things, and that's totally cool.
Back To Basics TipAs an aside, if you looked at an email of yours with multiple attached files, it would look VERY similar to the body of the first HTTP message as multipart MIME encoding is found everywhere, as is common with most good ideas.
Know what your library is hiding from you and why you chose it.
What ASP.NET offers for to catch File Uploads
The FileUpload control is just a control that sits on top of a bunch of support for FileUploads in ASP.NET, starting with the classes Request.Files and HttpPostedFile. Those are the things that actually do the hold on to the parsed Files from an HTTP Request. You can use them to get a hold of a stream (a bunch of bytes in memory that are the file) or just save the file.Since we can't use ASP.NET Server Controls in ASP.NET MVC, we'll use these classes instead. Here's how you usually grab all the files from an upload and save them:
1
2
3
4
5
6
7
8
9
10
| foreach (string file in Request.Files){ HttpPostedFile hpf = Request.Files[file] as HttpPostedFile; if (hpf.ContentLength == 0) continue; string savedFileName = Path.Combine( AppDomain.CurrentDomain.BaseDirectory, Path.GetFileName(hpf.FileName)); hpf.SaveAs(savedFileName);} |
Note that Request.Files has been around since 1.x and isn't a strongly typed collection of anything, so the GetEnumerator() of .Files that we're using in the foreach returns strings that are then used as keys into the Files[] indexer. It's a little wonky as it's old.
However, don't let me get ahead of myself, let's write the tests first!
How to Mock things that aren't really Mock Friendly
After creating a new ASP.NET MVC Project and making sure to select a test framework, I'll drop into a Controller Test and make a new TestMethod that kind of looks like I expect my method to be used.
1
2
3
4
5
6
7
8
9
10
11
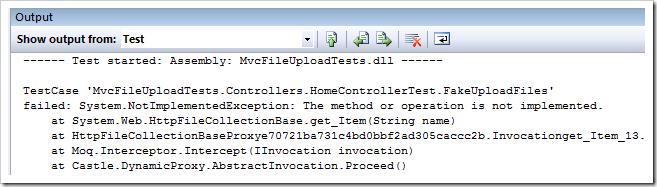
| [TestMethod]public void FakeUploadFiles(){ HomeController controller = new HomeController(); ViewResult result = controller.UploadFiles() as ViewResult; var uploadedResult = result.ViewData.Model as List<ViewDataUploadFilesResult>; Assert.AreEqual(Path.Combine(AppDomain.CurrentDomain.BaseDirectory, "foo.doc"), uploadedResult[0].Name); Assert.AreEqual(8192, uploadedResult[0].Length);} |
If we tried to compile this test, it won't, until I add a few types and methods. Once it actually compiles, but before I write the method itself, I'll want to see it FAIL. If you get a test to PASS on the first try, you don't really know yet if it CAN fail. Making it fail first proves that it's broken. Then you get to fix it.
Back To Basics Tip
Remember, in TDD, if it ain't broke, you don't get to fix it.
There's a bit of a chicken and the egg because it's unclear what will need to be mocked out until I start the implementation. However, this draft method above generally says what I want to do. I want to my controller to have a method called UploadFiles() that will grab the uploaded files from Request.Files, save them, then put a type in the ViewData saying which files were saved and how large they were.
Ok, take a breath. The following code may look freaky, but it's really cool actually. You can use any Mock Framework you like, but I like Moq for it's fluency.
We're having to "mock" things because we need to lie to our controller, who's expecting an HTTP Post, remember? It's going to go and spin through Request.Files and try to save each file. Since we want to test this without the web server or web browser, we'll want to tell the Moq framework about our expectations.
Back To Basics TipI've commented the code to explain...
Be careful to mock context and assert outputs but don't mock away the whole test!
1
2
3
4
5
6
7
8
9
10
11
12
13
14
15
16
17
18
19
20
21
22
23
24
25
26
27
28
29
30
31
32
33
34
35
36
37
38
39
40
41
42
43
44
| [TestMethod]public void FakeUploadFiles(){ //We'll need mocks (fake) of Context, Request and a fake PostedFile var request = new Mock<HttpRequestBase>(); var context = new Mock<HttpContextBase>(); var postedfile = new Mock<HttpPostedFileBase>(); //Someone is going to ask for Request.File and we'll need a mock (fake) of that. var postedfilesKeyCollection = new Mock<HttpFileCollectionBase>(); var fakeFileKeys = new List<string>() { "file" }; //OK, Mock Framework! Expect if someone asks for .Request, you should return the Mock! context.Expect(ctx => ctx.Request).Returns(request.Object); //OK, Mock Framework! Expect if someone asks for .Files, you should return the Mock with fake keys! request.Expect(req => req.Files).Returns(postedfilesKeyCollection.Object); //OK, Mock Framework! Expect if someone starts foreach'ing their way over .Files, give them the fake strings instead! postedfilesKeyCollection.Expect(keys => keys.GetEnumerator()).Returns(fakeFileKeys.GetEnumerator()); //OK, Mock Framework! Expect if someone asks for file you give them the fake! postedfilesKeyCollection.Expect(keys => keys["file"]).Returns(postedfile.Object); //OK, Mock Framework! Give back these values when asked, and I will want to Verify that these things happened postedfile.Expect(f => f.ContentLength).Returns(8192).Verifiable(); postedfile.Expect(f => f.FileName).Returns("foo.doc").Verifiable(); //OK, Mock Framework! Someone is going to call SaveAs, but only once! postedfile.Expect(f => f.SaveAs(It.IsAny<string>())).AtMostOnce().Verifiable(); HomeController controller = new HomeController(); //Set the controller's context to the mock! (fake) controller.ControllerContext = new ControllerContext(context.Object, new RouteData(), controller); //DO IT! ViewResult result = controller.UploadFiles() as ViewResult; //Now, go make sure that the Controller did its job var uploadedResult = result.ViewData.Model as List<ViewDataUploadFilesResult>; Assert.AreEqual(Path.Combine(AppDomain.CurrentDomain.BaseDirectory, "foo.doc"), uploadedResult[0].Name); Assert.AreEqual(8192, uploadedResult[0].Length); postedfile.Verify();} |
How to do File Upload with ASP.NET MVC
Now, what is the least amount of code in our Controller do we need to write to make this test pass? Here we get to use the Request.Files method that ASP.NET (not ASP.NET MVC) has had for years, and use it as advertised. It works in the tests and it works in production.Important Note: We have to use the HttpPostedFileBase class, rather than the HttpPostedFile because every Request, Response, HttpContext and all related ASP.NET intrinsic abstractions are one layer farther way in ASP.NET MVC. If you get an HttpRequest in ASP.NET, then in ASP.NET MVC at runtime...At any rate, here's the Controller that takes File Upload requests:
In each case, the instances you'll get are both (ultimately) of type HttpRequestBase, but it's this extra layer of abstraction that makes ASP.NET MVC easy to test and ASP.NET WebForms less so. I hope these Wrappers will be included in a future release of WebForms. The fact that they live in the System.Web.Abstractions.dll and not System.Web.Mvc.Abstractions.dll tells me someone has their eye on that particular ball.
- you'll get an HttpRequestWrapper while running under a Webserver
- you'll get a dynamically generated derived Mock of an HttpRequestBase while running outside a Webserver (like inside a test) when you've made your own ControllerContext.
1
2
3
4
5
6
7
8
9
10
11
12
13
14
15
16
17
18
19
20
21
22
23
24
25
26
27
28
29
30
| public class ViewDataUploadFilesResult{ public string Name { get; set; } public int Length { get; set; }}public class HomeController : Controller{ public ActionResult UploadFiles() { var r = new List<ViewDataUploadFilesResult>(); foreach (string file in Request.Files) { HttpPostedFileBase hpf = Request.Files[file] as HttpPostedFileBase; if (hpf.ContentLength == 0) continue; string savedFileName = Path.Combine( AppDomain.CurrentDomain.BaseDirectory, Path.GetFileName(hpf.FileName)); hpf.SaveAs(savedFileName); r.Add(new ViewDataUploadFilesResult() { Name = savedFileName, Length = hpf.ContentLength }); } return View("UploadedFiles",r); }} |
1
2
3
4
5
| <ul><% foreach (ViewDataUploadFilesResult v in this.ViewData.Model) { %> <%=String.Format("<li>Uploaded: {0} totalling {1} bytes.</li>",v.Name,v.Length) %><% } %> </ul> |
Conclusion
I always encourage people to take the little bit of time to use Fiddler or SysInternals or look at your call stack or just to take a breath and remind oneself, "so how is this supposed to work?" Otherwise, one is just cargo-cult programming.This post was a long answer to the question "How do I do FileUpload with ASP.NET MVC?" but I feel better having written in this way.
Subscribe to:
Posts (Atom)